|
81.5 Workflow Screen |
  
|
|
81.5 Workflow Screen |
|
81.5.1 There are 3 ways to access this screen:

In the Job screen -> click the Workflow tab.
This must be used if the job only follows one business process where all steps must be performed sequentially (ie. A step must be finished before the next step is performed). Changes in the workflow as the job progresses is also supported.
In the Job screen -> click the Task tab -> double-click a task to open -> click the Workflow tab
This must be used if the job will have multiple independent business processes that must be performed simultaneously. This is done by dividing the business processes into tasks that then allows creating separate workflows. Dependent workflows are not yet supported.
In the Notifications screen -> double-click the description of a workflow notification item
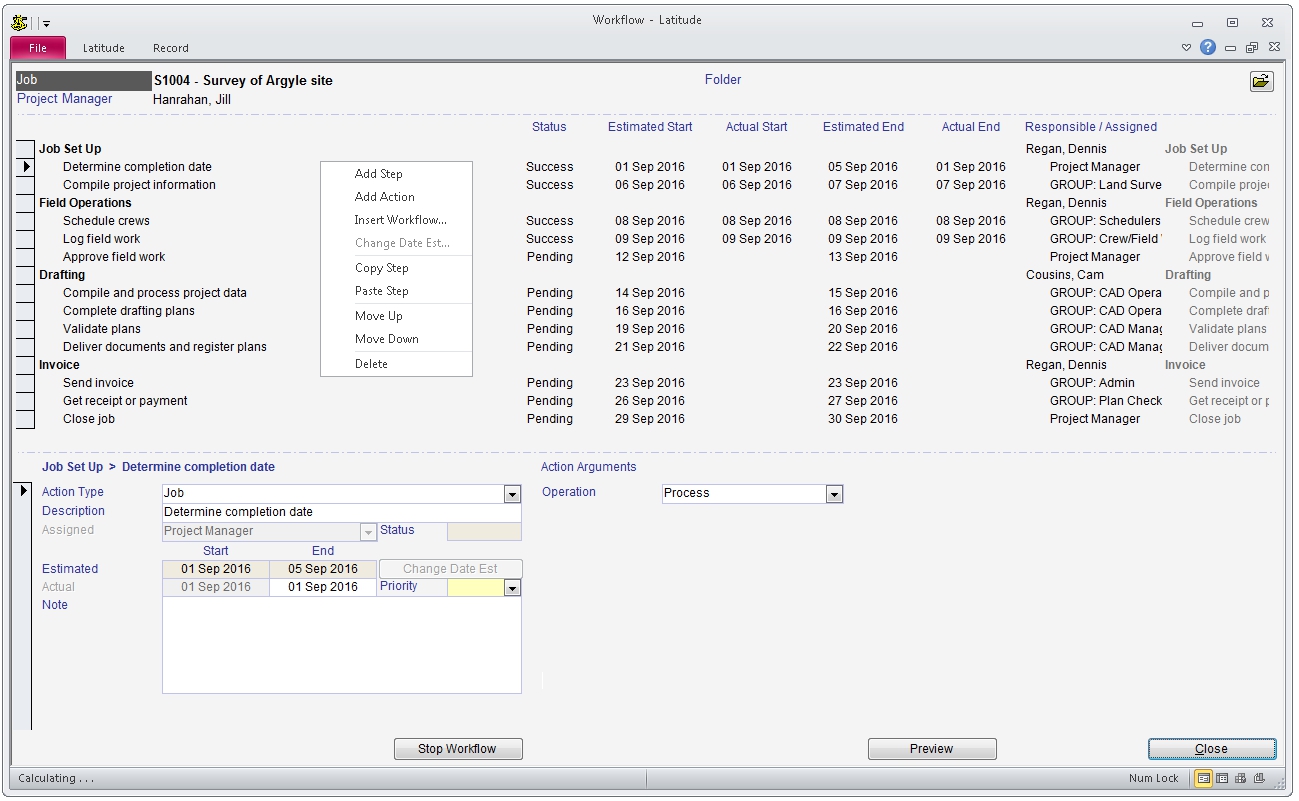
81.5.2 Summary View

The top half of the screen displays Steps and Actions belonging to a job. It includes the names of each step and action, estimated & actual start and end dates, and the responsible role that manages each step and the staff assigned to perform each action.
To add or change a workflow item, right-click any workflow summary line item to see the operations menu:
Add Step - Displays a new empty detail section at the bottom of the screen ready for you to enter a new step. When saved, a new step is added to the end of the workflow.
Add Action - Displays a new empty detail section at the bottom of the screen ready for you to enter a new action. When saved, a new action is added to the end of the step that has focus.
Insert Workflow... - Allows you to copy workflow steps and actions from a another job. Displays a screen for you to pick a job and the steps & actions you want to copy from it
In the "Insert Workflow" screen,
Click to toggle "Exclude" or "Include" on the "yellow" column. Clicking a step excludes or includes all actions belonging to it
By default, all steps and actions are included. Click the "Exclude All" button to exclude all and pick only those steps and actions you want to copy
Click the "Insert" button to insert the selected steps and actions above the workflow step that has focus
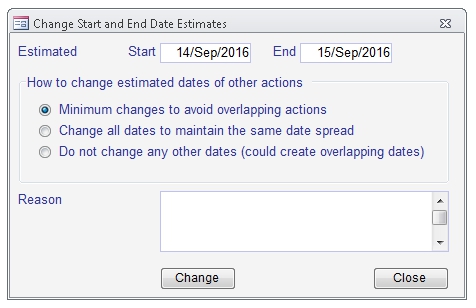
Change Date Est... - Opens the "Change Start and End Date Estimates" dialog screen
Copy Step - Copies a step and its actions to the clipboard.
Paste Step - Inserts the copied step and its actions above the step that has focus.
Move Up - Moves the step or action up.
Move Down - Moves the step or action down.
Controls located at the bottom of the screen:
Start Workflow at Step dropdown - Pick which step to start the workflow.
NOTE:
This will clear all actual start & end dates of later actions starting from the selected step and set their statuses back to 'Pending'.
This function is unavailable when entering a template workflow.
Start/Stop Workflow button - Starts or stops the workflow.
NOTE:
This function is unavailable when entering a template workflow.
Preview button - Displays a report with a list of workflow items with their statuses, estimated dates, actual dates and employee assignments.
Close button - Closes the workflow screen.
81.5.3 Detail View
The bottom half of the screen displays details of the step or action selected in the top half of the screen. These details can be edited here.
Steps contain the following fields:
Description - Description of the step.
Responsible Role - The role responsible for managing actions that are declined by all staff who can perform the role it was assigned. The responsible person must then reassign the declined action in order for the workflow to continue.
On Success, set Status to - Sets the job or task status to this value when all actions under the step are completed (ie. Action status = "Success")
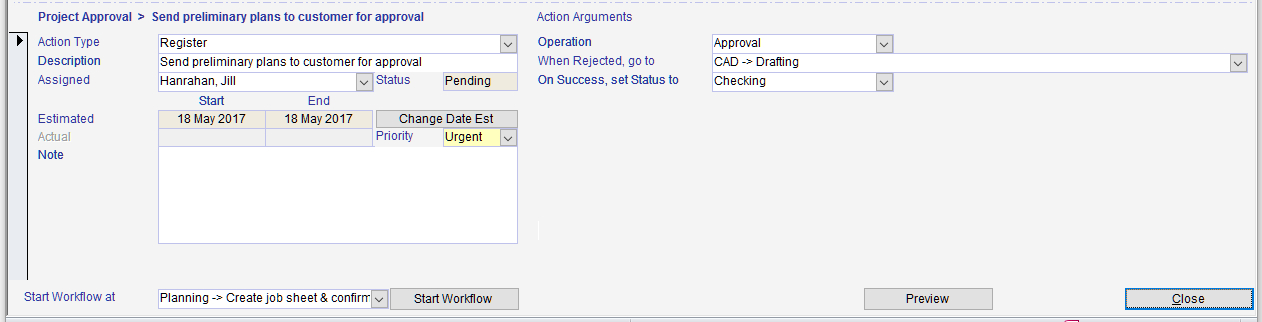
Actions contain the following fields:
Action Type - The (usually) screen to be opened when the assigned person accepts the action. Available "Action Types" include:
Field Ticket - Opens a work log ready for data entry (or if the action is already linked to a field ticket, it opens that field ticket).
Job - Opens the job screen for data entry.
Job Filter - Opens the job filter screen ready for searching.
Register - Opens the register screen for data entry.
Action - Opens the workflow screen with the action in focus ready for data entry.
Scheduling - Opens the scheduler screen ready for scheduling field staff and crews.
Task - Opens the task screen ready for data entry.
Invoice - Opens the invoice screen ready for data entry.
Manual - Does not open a screen. To close the action, right-click the action item and click the "Complete" menu item.
When the screen automatically opened when the workflow action was accepted is closed, Latitude prompts the user to confirm whether their work on the action is finished or not. If they click "Yes", the next action is automatically started. If they click "No", the status of the current action remains as "Started" and the action also remains on their notification list until they flag it as closed (complete).
Description - Description of the action.
Assigned Role - The role who is to perform the action. When one member of a role accepts an action, the action disappears from the notification list of all other members. If all members of a role decline an action, it returns to the responsible role's notification list.
Estimated Start Date - When the action is estimated to start.
Estimated End Date - When the action is estimated to end. If this is set, notifications change color depending on how close to (or past) this date they are (see Set Up Workflow Templates & Configuration -> Action Dates and Alert Period Colors).
Change Date Est - When clicked, opens the "Change Start and End Date Estimates" dialog
Actual Start Date - The date the action is accepted by an employee. This is automatically set when the action is accepted in the notification list which also changes the action's status to "Started".
Actual End Date - When the action is completed by an employee. This is automatically set when an employee closes (completes) an action which also changes the action's status to "Success".
Priority - Optional. Determines the rank of an action in the notification list when sorted by "Priority"
To configure, see Ribbon -> Lookup Tables -> More -> pick "Priority" (if it's not there, type "Priority" to add it)
Code - the numerical weight of the priority, 1 being the lowest to 9 the highest, eg.
1 - Low, 2 - Normal, 3 - High
Note - Optional. Additional details about the action.
Status - Read only. Shows the current status of the action.
NOTE:
Do not confuse this status with other Latitude statuses as they work independently with each other.
For example, when a job has a job status of "Closed" it is up to the project manager to end the workflow manually. This is so as even the job is closed, you can still perform actions to finalize the job eg. archive paper files. To automatically set the job or task status when a step or action progresses, see "On Success, set Status to".
On Success, set Status to - Sets the job or task status to this value when the action is completed (ie. Action status = "Success")
Operation - Controls branching of a workflow. If an action is not approved, the workflow branches to a different path rather than automatically moving on to the next action in the workflow.
Set to "Process" if the assigned employee only needs to indicate they have finished work on the action to close (complete) it, after which the workflow automatically proceeds to the next action or step.
Set to "Approval" if the assigned employee checks work done in prior action(s) and then needs to approve or reject it. If approved, the workflow automatically proceeds to the next action or step. If rejected, the workflow branches to perform a different action elsewhere in the workflow.
When Rejected - the action to perform when an action is rejected.
81.5.4 Change Start and End Date Estimates Dialog

A popup dialog that allows changes to the start & end date estimates with options on how it affects the estimated dates of other actions.
Options are:
Option 1 - Minimum changes to avoid overlapping actions - moves the current action's estimated dates closer to the dates of adjacent actions until the gap between the current and adjacent action estimated dates become zero (0). If the gap is already zero, it squeezes the duration of the adjacent action estimated dates until the current action estimated dates fits in the timeline.
Option 2 - Change all dates to maintain the same date spread - changes all estimated dates of adjacent actions so they become closer but it does not change the duration of each action.
Option 3 - Do not change any other dates - leaves estimated dates of adjacent actions unchanged. This also allows you to have actions with overlapping dates.
NOTE:
Having overlapping dates does not cause Latitude to execute multiple actions in a workflow in parallel (simultaneously) as actions are always executed in sequence one at a time.
Reason - Reason - Optional. Text entry on why the estimated dates were changed.
NOTE:
When entering a template workflow, enter the estimated start & end dates based on an "ideal" project cycle you would like to be able to follow..
81.5.5 Action Dates and Alert Period Colors
Workflow estimated and actual dates only serve as an indicator to track the workflow action schedule and for statistical analysis of performance. They are NOT used to control when an action is triggered, or to set its importance. As an example, if you have a 'field work' Action estimated to last 5 days but the actual field work is finished in 3 days, the workflow will proceed to the next action ahead of your estimated schedule.
Indicate action urgency in the Notification screen with color
Color actions ready to be done (green), due now (orange) or overdue (red) based on the number of days to, or past their estimated end dates.
Go to Setup -> Notify -> Workflow
On Time/Not Due Just Yet (Green) - if you consider an action as being not due yet, up until the day before its estimated end date, enter "1", if only up to two days prior to its estimated end date, enter "2", if only up to three days prior, enter "3", etc.
Due Now (Orange) - to warn staff that the action is due immediately if it isn't to be late on its estimated end date enter "0", if you want this warning color to start the day before the estimated end date enter "1", if from 2 days prior to the estimated end date enter "2" etc.
Overdue (Red) - if you consider an action overdue from the day after its estimated end date enter "-1", if it isn't overdue until two days past its estimated end date enter "-2", if it isn't overdue until three days past its estimated end date enter "-3", etc.
81.5.6 Workflow Permissions
Workflow has inbuilt security that allows you to give groups of users different levels of access (from general to specific access):
Object security - find the "frmWorkflow" object and set a letter (indicating read/write permission) or a number (indicating read-only permission) to be able to give those rights to users.
A project manager always has full authority over their project/task's workflow - they can create, modify, delete, start and stop the workflow at any time.
The responsible role assigned to a step has the full authority over the step and all actions under it - they can create, modify, delete, reassign and end actions at any time.
The role assigned to an action has limited authority over the action - they can enter notes, dates, run the screen associated with the action and can end the action.

)
)
)
)