|
54.11 Produce the Invoice |
  
|
|
54.11 Produce the Invoice |
|
54.11.1 Press the "Produce Invoice" button to open the "Invoice Template" screen.
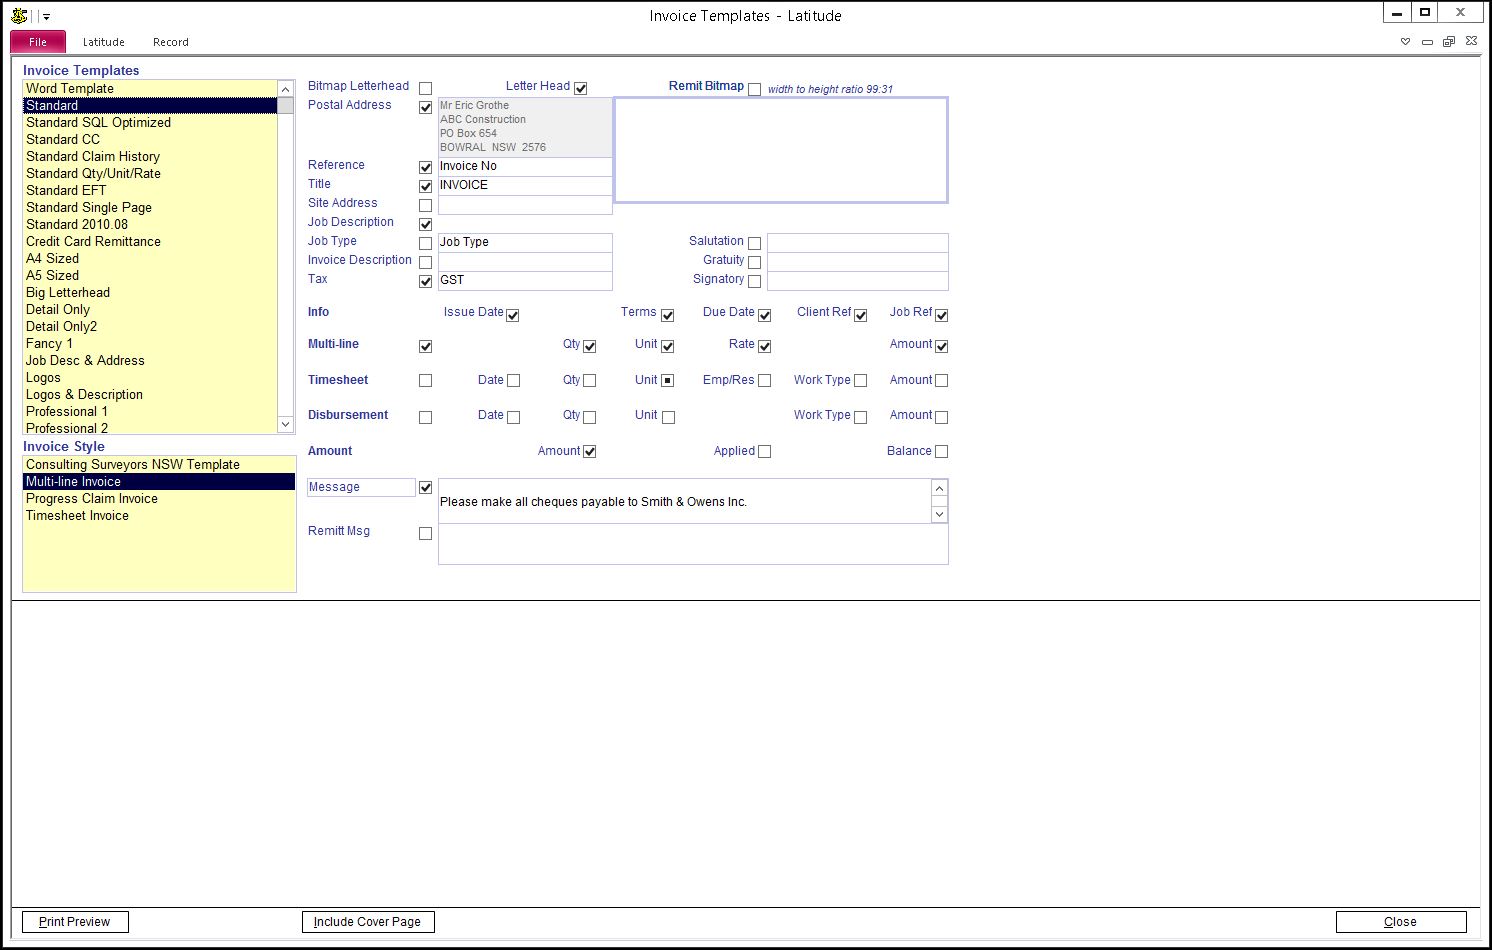
54.11.2 Select an appropriate Invoice Template from the "Invoice Templates" List.
Explore Invoice Templates and see which Invoice Template(s) suit your business or use Custom to use your own Microsoft Word Templates.
For more details on how to create Custom Invoice Templates, refer to "How do I create Word Templates that Latitude can use" in this How To Guide.
54.11.3 Click an appropriate Invoice Style from the "Invoice Style" List. Then press the "Print Preview" button located on the bottom left corner of the screen.
If you cannot find an Invoice Style you like, continue to follow these instructions to create a customised "Invoice Style".
54.11.4 Double-click anywhere inside the purple area labelled as "Invoice Style" to open the "Invoice Styles" screen.
54.11.5 Enter a name of an Invoice Style. Close the screen.
54.11.6 On the right hand side of the screen, select the data you wish to include in your invoice
Bitmap Letterhead: SELECT THIS OPTION ONLY IF YOU HAVE SET UP A LETTERHEAD BITMAP IN THE "SET UP LATITUDE" SCREEN. (see the "Setting Up Latitude" section above on how to set up a letterhead bitmap). Select this option to use a bitmap image of your own letterhead. This option is currently only available in the "Invoice GST Tax Invoice" Template.
Letter Head: This includes your company name, company information (A.B.N., phone number etc.) using Latitude format. If you wish to use your company's pre-printed letter head paper to print Invoices, then de-select both options.
Remit Bitmap: Select to remove the remittance section of the invoice or paste to use your own remittance bitmap
Postal Address: Postal address of invoice recipient.
Reference: If you want to include your Invoice reference number, select this and enter label text for the reference number, often this is the Invoice No.
Title: If you want to include a title for your invoice, enter a title e.g. TAX INVOICE, MEMORANDUM OF PROFESSIONAL FEES.
Site Address: Show Job Property Address (Street Number, Lot, Street Name, Locality)
Job Description: Show Job Description
Job Type: Show Job Type when using Invoice Complex Multi-line template
Tax: Show Tax on the invoice; enter a title
Salutation, Gratuity, Signatory: If you want to include Salutation, Gratuity or Signatory, select these and enter text. Please note that not all invoice templates show Salutation, Gratuity and Signatory.
Info: Include or exclude a Jobs' Description, Reference, Client Reference and Site Address, as well as the Credit Terms, Issue Date and Due Date from an Invoice. These flags have been added to the "Produce Invoice" screen. If you decide to exclude any of these the associated label/s are also excluded from the Invoice.
Timesheets, Multi-line, Disbursements: Include or exclude Date, Qty, Unit, Emp/Res, Work Type, Rate, and amount in the invoice. For example you may want to include the Work Types that your staff
performed, but not necessarily want to show their names, then select "Work Type" and not "Emp/Res".
Amounts, Applied, Balance: If you want to include Amounts, Applied and/or Balance, select these.
Message: You can enter a message at the bottom of Invoices. This field can include rich text features
Remitt Msg: Show message when using Invoice Complex Multi-line template
54.11.7 Press the "Print Preview" button to view the Invoices.
54.11.8 To view invoices after you have entered them, simply press the "Produce Invoice" button and in the Invoice Template screen press the "Print Preview" button.
54.11.9 You can create more than one "Invoice Style" in the same way as you did above, if necessary.

)