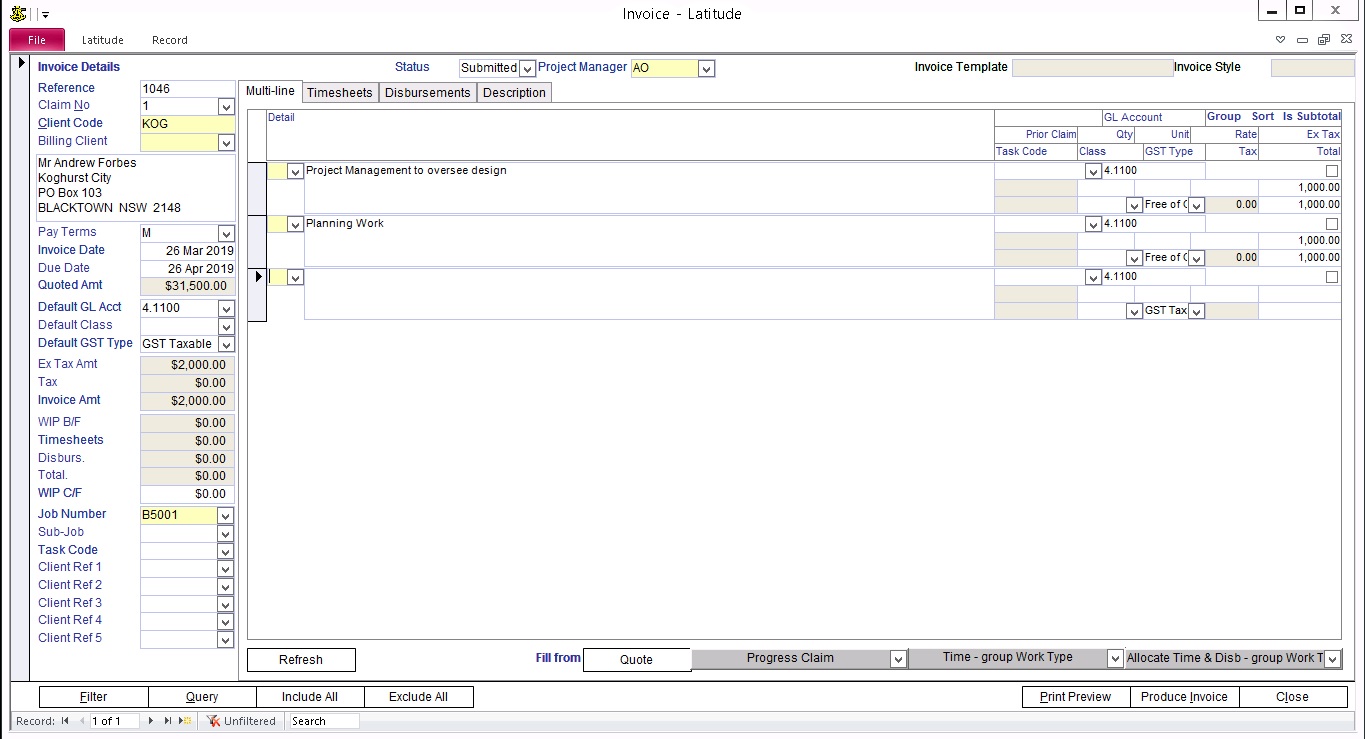
54.3.1 Reference

The Invoice number is calculated as a plus one increment from highest numeric invoice number in the database. The invoice number can be altered but make sure not to use an existing invoice number.
If the Invoice number already exists in the database, Latitude will prompt a message 'This Invoice number has already been used. You should use a different Invoice Number.' but it does not stop you from creating the invoice. Having unique Invoice Numbers is important when doing reconciliation, search and reports.
54.3.2 Claim No
An automated sequential numbering system used in Progress Claim invoicing to keep track of the prior claims to offset the current invoice claim
54.3.3 Client Code
This yellow field auto-fills with the client's company code. Double-clicking the field directs you to the Business Contact screen.
54.3.4 Billing Client
Select a recipient of the invoice from the drop-down. The default entry is the billing contact of the job but you can opt to override it with any active clients available.
If you want to bill a third party company instead, go to Invoice screen -> choose the Billing Client to set the billing address
54.3.5 Invoice Address
Defaults to the Job Billing Contact and Billing Address or if none have been entered, to the Main Contact and Client Postal Address. You can override this default by manually entering the Invoice Address.
54.3.6 Pay Terms
The Pay Term value is from the Client screen or blank if none entered. Enter a different value without affecting the default Client Pay Terms. This is a self-referential dropdown, meaning as you enter values they will be available to other invoices you make.
54.3.7 Invoice Date
Default value is today's date or enter a different date.
54.3.8 Due Date
Calculated using the Pay Terms set in Client screen. If you had altered Pay Terms for this invoice, you will also have to alter the Due Date for this invoice.
54.3.9 Quoted Amount
Set in Job / Project. (For instructions on 'How To' enter Quotes refer to the Quote topic in this How To Guide.
54.3.10 Default GL Account
The value will be defaulted to the "Default Income Account" on the "Accounts Link" tab of Setup Latitude. The value selected will be the default for any Invoice Lines you create. Enter a different GL Account if you have multiple income accounts.
54.3.12 Default GST Type
The default value is from the "Finance" tab of Setup Latitude. The value selected will be the default for any Invoice Lines you create.
If Tax has been set to ON for the application then the Tax Amount will be calculated based on the Tax Type you have selected. If Tax has been set to OFF then the Tax Amount may be entered.
54.3.13 Select Invoice Status (Business Edition / Corporate Edition ONLY)
Timesheets allocated to a draft invoice do not affect WIP and cannot be allocated to another invoice.
Draft invoices do not appear on some reports.
Change invoice status from Draft to Submitted when completed
A draft Invoice can not be deleted if any timesheets have been allocated, all allocated timesheets must be un-allocated first.
54.3.14 Select Company (Business Edition / Corporate Edition ONLY)
Select which of your companies this invoice is from. If left blank, Latitude uses the default company defined in Setup Latitude
54.3.15 Ex Tax Amount, Tax and Invoice Amt
These are non-editable fields and auto-calculated by the system. It is the sum of all the non-group Ex Tax, Tax & Total Invoice Line items.
54.3.16 WIP B/F
Auto-filled from the previous Clients Invoice that has a WIP C/F (Carry Forward) amount.
54.3.17 Timesheets
Click the Timesheet tab and toggle/change the 'Inv' column to 'Yes' for every Timesheet you want to allocate in this Invoice. The Timesheets field is automatically recalculated by the system.
54.3.18 Disburs. - Total allocated disbursements
Click the Disbursement tab and toggle/change the 'Inv' column to 'Yes' for every Disbursement you want to allocate in this Invoice. The Disburs field is automatically recalculated by the system when changes are made.
54.3.19 Total
The sum of WIP B/F, Timesheets and Disbursement fields
54.3.20 WIP C/F
To Invoice only a portion of the calculated Invoice Amt you may carry a part of the amount forward. To do so, select which line item you want to decrease to adjust the Invoice Amt and enter the Carry Forward amount in the "WIP C/F" field
Example: To Carry Forward $1,000 from Invoice# ABC001 to Invoice# ABC002 (the next invoice for the same Client), you have to decrease a line item in Invoice#ABC001 for $1,000 then enter $1,000 in Invoice# ABC001 ""WIP C/F"" field." -1 0 -1 -1
54.3.21 Project Manager
Automatically assign the current job captain when creating new invoice