|
51.2 Creating a Word Template |
  
|
|
51.2 Creating a Word Template |
|
51.2.1 Enable Developer tab
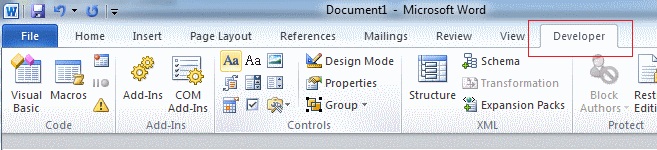
For Microsoft Word 2010/2013/2016
Open Microsoft Word
Click File -> Options -> Customize Ribbon
In the Main tabs, tick Developer
The Developer appears as one of the Tabs
For Microsoft Word 2007
Open Microsoft Word
Click File -> Word Options -> Popular
Under Top options for working with Word tick 'Show Developer tab in the Ribbon'
Click OK
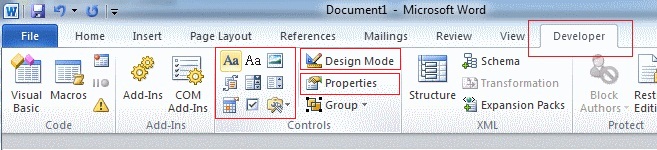
51.2.2 Common Content Controls
Use Microsoft Word’s common content controls to display Latitude fields on a template. To display a Client Name, use the Plain Text Control. To display a Job Date, use the Date Picker control. The following is a list of common content controls:
Date Picker – Display dates. Use the Date Picker Properties to change the way date is displayed
Plain Text – Display any fields as plain text
Rich Text Control - Do not use; use only Plain Text
Picture – Display an image such as a logo, bitmap, photo, etc.
Building Block Gallery – Display tabular data like a timesheet or invoice list. A building block must have at least one table row and column inside it
Design Mode – toggle to show how each field is formatted
Properties – specify how a control behaves
51.2.3 To create a simple packet sheet that only shows the Client Name, Job number, Job Description, Job Site Address and job date, do the following:
51.2.4 Open a new word document

Click Developer tab
Position cursor on the word document where you want to place a control
Note: To have flexibility on displaying content controls on specific sections of a word document place the control inside a table or text box.
Select and click a control
The selected control appears on the word document
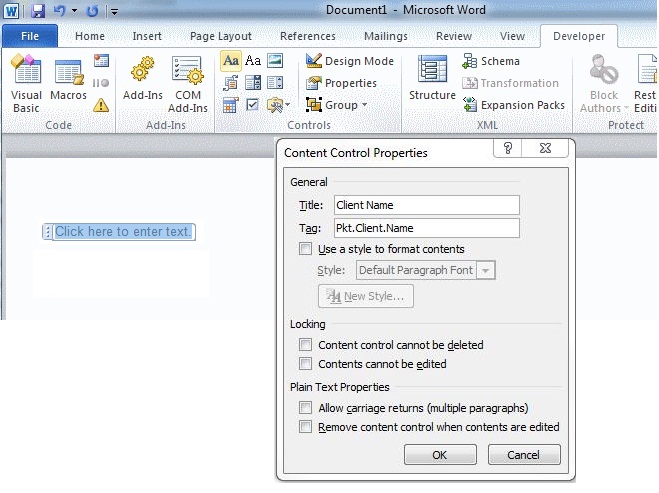
Click Properties
Enter Title: Client Name
Enter Tag: Pkt.Client.Name
Note: Use the correct tag list for each template to define Content Control Properties. Download the Invoice, Register, Packet Sheet and Quote Tag List from the Latitude website.
Click Ok
Click on where it says ‘Click here to enter text.’ and type Client Name as a description
Right-click and apply formatting e.g. color, font, bold, etc.
Click on the next line or section of the word document to add more controls
When done, click File -> Save as
Select the folder where all your word templates are saved e.g. L:\Latitude\Templates
Filename -> enter a filename
Save as Type -> dropdown list and select Word Template (*.dotx)
51.2.5 Building Block Gallery Control

Use this control to create a list such as Invoice Multi-line items, Timesheets or Disbursements. Create only one control for a list. To create a list, do the following:
Position the cursor on the word document where you want to display the list
Create a single table with Columns. The number of columns depends on what section of the line item you want to appear on the list ( Qty, Unit, Rate, Ex Tax, GST, Tax, Total, etc. )
Fill-in each column with a content control
Enter the Properties for each content control
After placing all content controls on the columns, highlight the whole table and click the Building Block Gallery Control
The Building Block Gallery Control Tag appears
Tick inside the Building Block Gallery Control Tag and click Properties
Enter the Title and Tag and click OK
51.2.6 Add Currency symbol
You can add currency symbols to tags on fields that need to show currency symbol. Simply place the currency symbol to the left of the control.
51.2.7 Add Headers
To have a standard header that has tags from Latitude fields, do the following:
Add a Header
Using Word click Insert -> Header
Adjust the height of the header by placing more spaces
Paste your letterhead bitmap in the header
Place in the header all the tags and words you want
After formating the header the way you want it to appear, click anywhere outside the header
Add a Textbox
Create a new textbox in the body
Place the exact same tags that you placed in the Header
Minimize the size of the newly created textbox to proximately 2-3 millimeters in height so that the tags you placed inside will appear to be hidden
Click the textbox, right click and select Format Shape
Click Fill -> tick No fill
Click Line Color -> tick No line
51.2.8 Remove Place Holders
When you generate a Word template, fields that do not have values in Latitude will show a place holder that says 'Click here to enter text/date'. To remove this message, do the following:
Open the Word template
Click Developer tab
Click Design Mode
Select the field that you want the phrase 'Click here to enter text’ removed
Example: [Inv.PayTerms]Click here to enter.[Inv.PayTerms]
Click inside the tag and highlight the phrase 'Click here to enter text.'
Press the space bar
Save the template
51.2.9 Save the Template
After adding all the required controls, save the newly created template in your templates folder and save it as a Word Template (*.dotx).
51.2.10 Using Tables and Text Boxes
Make formatting easier by placing content controls inside a table or text box. Almost all Latitude sample templates use tables to position/align the controls


)
)
)
)
)