|
40.8 Timesheet Printout |
  
|
|
40.8 Timesheet Printout |
|
40.8.1 Timesheets can be printed on customizable Word templates by 1 week or 2 weeks. They can be used to give employees a hardcopy timesheet for record-keeping or payroll purposes. Before you can generate a printout, you must define a word template. If you want to record lunch start time and end time, create a lunch work type, and assign this work type to the employee.
40.8.2 Set Up a Word Template
Extract a template provided by Latitude Support or downloaded from the Latitude website into your Word Template folder eg. L:\Latitude\WordTemplate\
Open Latitude.
On the ribbon, click 'Administration' and select 'Setup'.
Go to the 'Time' tab and locate the Timesheet Word Template.
Click Done and then click 'Ok'.
40.8.3 Set Non-Chargeable 'Lunch' Work Type
On the ribbon, click 'Lookup Tables' and select 'Work Type'.
Enter 'Lunch' as a Code, Name and Description.
Click the 'Non-Chargeable' checkbox.
40.8.4 Configure Employee Settings
To distinguish a break between morning and afternoon work hours in the timesheet printout, you need to follow the steps below.
Assign 'Lunch' Work Type to the Employee
On the ribbon, click 'Management' and select 'Employee'.
Select 'Lunch' from the 'Work Type' drop-down.
Set Cost and Charge Rates to $0.00.
Set Up Employee Folder
On the ribbon, click 'Management' and select 'Employee'.
Specify a path in the 'Folder' field to an Employee folder where you can save generated Timesheet word documents.
NOTE: If there is no specified employee folder, Timesheet word documents are saved in the Accounting Link export path.
40.8.5 Print a Timesheet
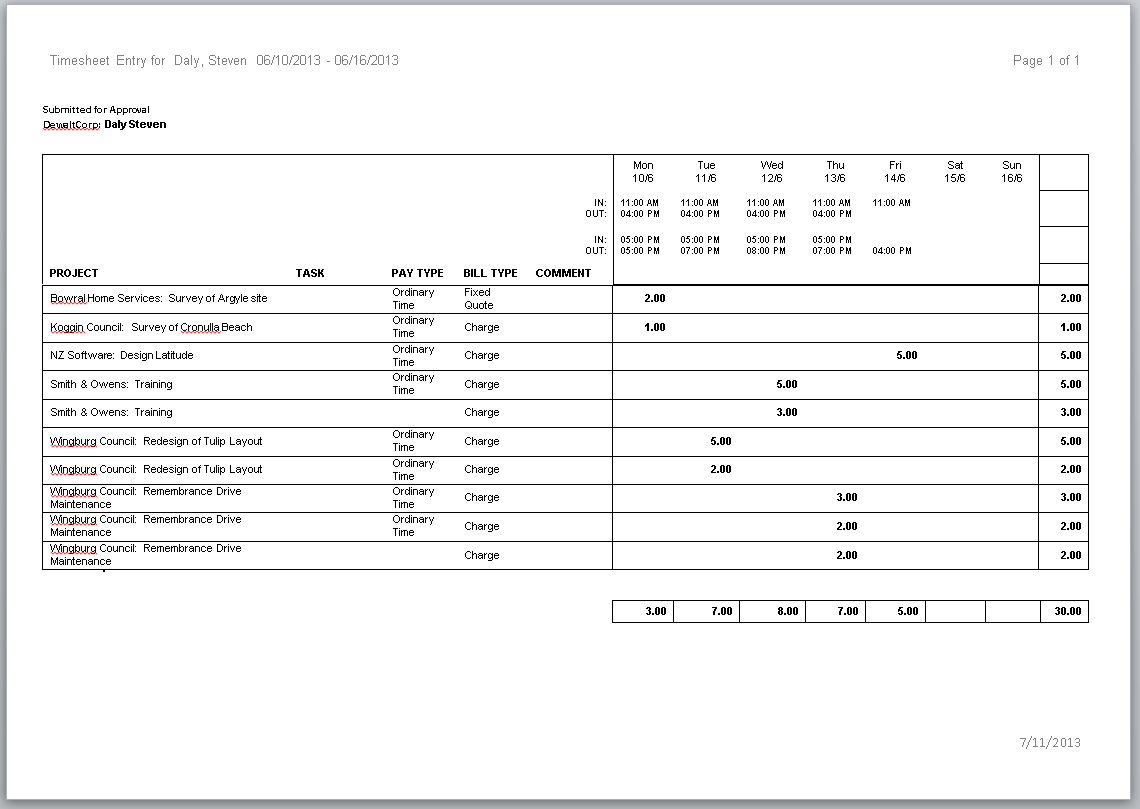
Timesheet printouts can be used if an employee such as an engineer works at a construction site and needs to validate his working hours per week by having it signed by an onsite superior before submitting it to the payroll department. It can also serve as reference attached to an invoice for billing clients.
Click the Homescreen 'Timesheet' button.
Select an employee from the employee list.
Click the 'Preview' button.
Enter a week start date to select days that have time entered.
Select Period (1 Week or 2 Weeks)
Note, Period does not change the print-out to display 1 week or 2 weeks. If you need to, you need to change the wordlink template instead
Click 'Preview' to view timesheets for the week.

)