|
40.2 Fill out the Timesheet form |
  
|
|
40.2 Fill out the Timesheet form |
|
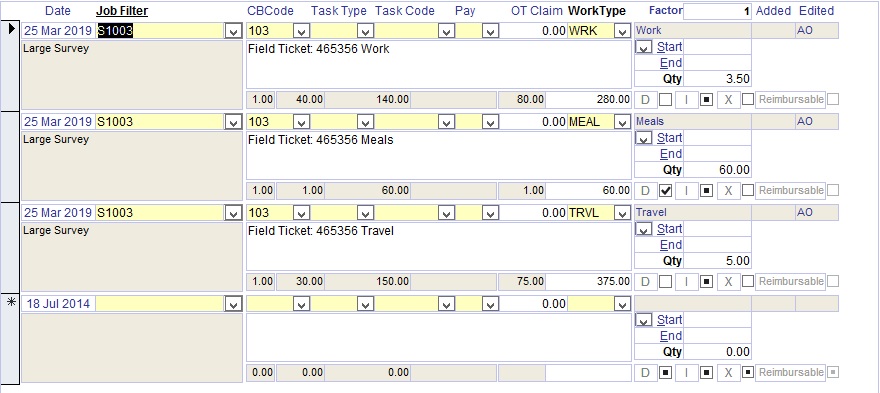
40.2.1 Select an Employee or Resource from the list of active employees and resources list. Latitude selects (highlights) the current user as a default.
40.2.2 Select the date that you are entering the timesheet for by clicking the date in the calendar. By default, today's date is selected. You can see the date of the timesheet that you are entering in the grey box in the "Date" column on the right hand side of the Timesheet screen.
40.2.3 Select the Job you are recording the timesheet for. Note that only Jobs / Projects whose Status is "open" appear in the drop down list. When you have selected a Job, selected details of the job will appear in the adjacent display box.
40.2.4 Select CB Code if you are using CB Codes.
If you select Group Work Type by CB Code (Setup Latitude -> Options 2 -> Timesheets -> Group Work Types by CB Code), when you enter timesheets, it would require you to select CB Code before you can select the Work Type.
40.2.5 Select a Task Type
If you want to assign the time to a group of tasks then use the Task Type.
40.2.6 Select a Task Code for the Job
If the Job has a Task/Timesheet restriction in place where 'Task Timesheets Only - all timesheets on this job must belong to a task', employees are required to select the task code to enter a timesheet. This is a requirement if creating a Progress Claim Invoice for 'Progress Task Qty'.
Note, a warning message automatically shows when you have entered timesheets hours going over the budgeted task hours.
40.2.7 Select Pay type (optional). This data is used if you link to a Payroll system, such as PowerPay.
40.2.8 Enter Overtime Claim in hours
Generate Employee Hours & Overtime Claim by category for a week (Report #383) - see Reports -> Employee/Equipment
40.2.9 Select a Work Type. The drop down list shows only Work Types allocated to the employee or resource. Furthermore, if the "Group Work Types by CBCode" option is selected in the Setup Latitude, only Work Types for the selected CBCode are shown on the drop down list.
NOTE: Do not set CB Codes unless Latitude Support has directed you to use them.
If you select Work Types that are marked as "Disbursements", the small box labeled as "D" below Qty will automatically be selected and it will be shown in the "Disbursements" tab in Invoices.
If you select Work Types that are marked as "Non-chargeable", the small box labeled as "X" (near "D") will automatically be selected and the charge will be $0.00.
If you have set Work Types that are marked as 'Reimbursable' Disbursements, a corresponding checkbox will automatically be selected.
A timesheet that has been exported to MYOB and QuickBooks will display the 'Re-Export' button, giving you the option to export it again.
NOTE: For more information in Setting Up Work Types, please see Section 10 of this How-To Guide.
40.2.10 Enter Qty.(normally hours) entering the Start and End times are optional. In other words, you can determine the Qty by either entering the Start and End times and letting Latitude calculate the Qty or you may enter a Qty without Start and End times. After the Qty is entered, Latitude calculates the total cost and charge amounts for this timesheet entry.
You can see the details of the calculation for the total charge amount by double-clicking the white box at the bottom of each timesheet entry.
NOTE: There is an option that allows you to edit the cost & charge rates in the Timesheet screen, directly overriding the rates assigned to the employee or set in the job charge override. As there is too much risk with this option, contact Latitude Support to discuss the business needs and how to configure this option
40.2.12 Enter a description for this timesheet entry. This description will appear in Invoices when you select "show description" in an invoice Style.
40.2.13 You can confirm the total number of Qty (usually hours, unless disbursements have been entered) for the day at the bottom right corner of the Timesheet screen.
40.2.15 Timesheet Charge
Latitude follows a series of rules to derive the charge rate used when a timesheet is entered (the most common of these are Rate Schedules and Employee Rates). To illustrate how this actually works, when an employee enters a timesheet, Latitude searches through a series of settings in the following order:
If a "Rate Schedule" is set, Latitude uses it.
The Rate Schedule overrides the employee's Work Type charge rates. Consequently, if a Work Type is not in the Rate Schedule, the employee's Charge Rate is used.
See "How do I set Charge Rates for a particular Job" -> "Charge Rate override using a Rate Schedule"
Rate Schedules are one of the two most commonly used ways to set charge rate (the other is Employee Rates)
If a "Rate Schedule" is not set but a "Work Type" charge override is set, Latitude uses that.
Job Work Type Charge Rates override the employee's Work Type charge rates. Consequently, if a Charge Rate for a Work Type is not set for a Job, the employee's Charge Rate is used.
See "How do I set Charge Rates for a particular Job" -> "Charge Rate override using Work Type"
If a "Work Type" charge override is not set but a "Task Type" charge override is set, Latitude uses that.
The Rate Schedule assigned to a specific Task Type overrides the employee's Work Type charge rates. Consequently, if a Work Type is not on the Schedule, the employee's Charge Rate is used.
See "How do I set Charge Rates for a particular Job" -> "Charge Rate override using Schedules and Task Types (Business Edition & Corporate Edition ONLY)"
If a "Task Type" charge override is not set but an "Employee Class" is set, Latitude uses that.
The Employee Class Billing Rate overrides the employee's Work Type charge rates. Consequently, if a Billing Rate for the Employee's Rate Class is not set and the Employee does not have a Rate Class set for a Job, the employee's Charge Rate is used.
See "How do I set Charge Rates for a particular Job" -> "Charge Rate override using Employee Class"
If an "Employee Class" is not set but "Employee Rates" are set, Latitude uses them.
See "Set Up Employees" -> "Billing Rates"
Employee Rates are one of the two most commonly used ways to set charge rate (the other is Rate Schedules)
If "Employee Rates" are not set but "Universal Disbursement Rates" are set, Latitude uses them when entering disbursements
See "Set Up Work Types" -> "Enter Work Types"
If "Universal Disbursement Rates" are not set but "Employee Remuneration" is set, Latitude uses that
See "Set Up Employees" -> "Enter Details for Each Employee"
In addition to deriving the charge rate, the actual charge amount (ie. Extension) is also modified by the "Unit Excess" set in the "Business Contact" and "Work Type Lookup" screens and by the "Loading/Discount" set in the "Business Contact" and "Job / Project" screens:
Unit Excess - An excess charge applied each time this work type is entered in a Timesheet. This amount can be varied on an individual client basis by entering a percentage Unit Excess in the Business Contacts form. Entering a percentage into the Unit Excess field on the Client form will either discount or add this Unit Excess amount for this client when the relevant Work Type is used on a Timesheet.
NOTE: Unit Excess is rarely used and so in almost all cases use the default $0.00 amount.
Discount - Entering a percentage into this field will either discount or add to Timesheets for this client as they are entered. To discount timesheets enter a percentage less than 100 eg. 90 to charge 10% less (ie. give a 10% discount). To add to a timesheet enter a percentage greater than 100 eg. 110 to charge 10% extra.

)