|
29.3 Enter the General Job Details |
  
|
|
29.3 Enter the General Job Details |
|
29.3.1 Select the "General" tab.
29.3.2 The File Ref
An internal Filing Reference of packet number, normally used to coordinate with a paper based system.
29.3.3 Billing Type
Click the combo box and select the Billing Type, usually "Charge".
29.3.4 Job Status
Select the Job Status, usually "Quote" or "Current". For more information on Job Status see the 'Set up Job Status' section of this manual.
29.3.5 Job Date, Start Date and Expected Date, End Date
Job Date is defaulted to today's date. When the Job is completed, enter End Date. These dates will appear in Job reports.
29.3.6 Client Code
If you enter via Business Contacts, this field is automatically populated. If you use the direct entry method, type a Client Code or select using the dropdown list. When you have selected a Client, the client name will appear in the adjacent field.
29.3.7 Instructing Person
Click on the combo box and select the client's point of contact for this job. Contacts are entered first in the Business Contacts -> Contact tab for it to appear in the combo box.
29.3.8 Billing Contact
Select a billing contact to whom the invoices are sent. If there is no Billing Contact selected, Invoices will be addressed to the Client's Main Contact. This allows Invoices to be sent to Contacts who are not the Client's "Main Contact', for example the direct client could be an Architect but the Invoice could be sent to the end client who is a Construction company.
Choose the project billing contact you want to bill from among the Team contacts
Choose whether to use the Client's postal address or the Billing Contact's postal address.
Note: If an Individual is selected as a Billing Contact and the contact has a Company Name entered in the Contacts screen, then the Billing Address becomes his name, Company Name and Postal Address. If he has no Company Name then the Contact is regarded as an Individual and therefore the Billing Address will have Contact's name and his Postal Address only (no Company Name in the address).
29.3.9 DP (Deposit Plans)
Enter DP if applicable. You can enter more than one item in the DP field separated by commas or semi-colons.
If DP is not called DP in your state or country, you can change the label in "Custom Fields" screen. For more information about changing labels, refer to "How do I customise Field Names" Category in this How To Guide.
After you have entered all the items for the DP field, double-click on it. Latitude will search the Register to see if you already have any of these documents in your office, and if so, where they are stored.
For more information on the Register see the relevant section later in this How To Guide.
If a DP is not registered in Latitude, do the following steps:
a) Enter Deposited Plans(DP) no in the DP field Navigation:
Business Contacts->Jobs->select existing job or buildup job->enter design plans (DP) in the DP field
b) Double-click on the DP field
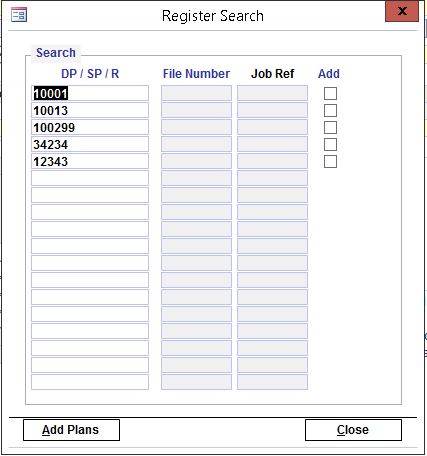
If the DP is not on the register, the add checkbox field will appear. Placing a tick mark on the Add checkbox and clicking the Add Plans button will automatically add an entry in the Register.
c) From the Register Search screen, under DP/SP/R you should see the DP no.
d) Click on Add->click on Add Plans
e) Click Yes to append
Once you click Yes, you can’t use the Undo command to reverse the changes.
Latitude creates a new register entry with some of the fields filled-in such as Job no, Register type, date, client, File, Plan no., Memo (Street Name & Locality).
f) Click on Register button
g) Select newest Register entry & details will be displayed
h) Enter additional details i.e. (to, from, re, memo, & attach scanned file)
i) Press F9 to save and refresh
The File Number corresponds to the File field in the register. This could be a reference number used in your filing system. The Job Ref is the Job No.
29.3.10 Load/Disc%
Enter percentage that serves as an add-on (positive value) or discount (negative value) for any work done on the job. Timesheets entered against a Job that has a Load or Discount will have the charge rate recalculated based on loading or discount value. Load or Discount percentage is rarely used and so in most cases leave it as blank.
29.3.11 Local Govt, Parish and County
These are self referencial fields. Each of which provide a drop-down list of all the unique values that have been entered in these fields in your other jobs
Self referential means that as you add values to these fields, future records will have all the previous values added as an option in the drop down box.
29.3.12 Special Details
Enter any notes e.g. instructions, requirements or any message that you want users to see immediately. To enter a new line within this field press CTRL + ENTER on the keyboard. To view the entire field press SHIFT F2.
29.3.13 Project Manager, Job Sub-Captain
Select employee name from the dropdown box. You can also customise the field names such as Project Manager to Job Captain.
For information on how to customise field names, refer to "How do I customise Field Names" Category in this How To Guide.
29.3.14 Default Work Type
Select a Default Work Type. The default work type of the job or project auto-fills the ‘Work Type’ field in the timesheet when the work type has been assigned in the employee’s billing rates. The job setting overrides the employee setting.
NOTE: You cannot assign a standard disbursement work type to a job's Default Work Type. Before it can be used as a default work type, it must first be assigned to the employee.
29.3.15 Enter the rest of the information, where appropriate.
For Estimated Hrs, Estimated Cost and Quoted Amt, you can manually type values in this "General" tab or enter them in the "Quote" tab. The values you enter in the "Quote" tab will be automatically copied to the "General" tab. Please note that you will still have to select an appropriate Tax Type for the Quote in the "General" tab.
For more information about Quote refer to "How do I create a Quotation for a Job" Category in this How To Guide.
29.3.17 Priority - Optional. Determines the rank of a notification item in the notification list when sorted by "Priority"
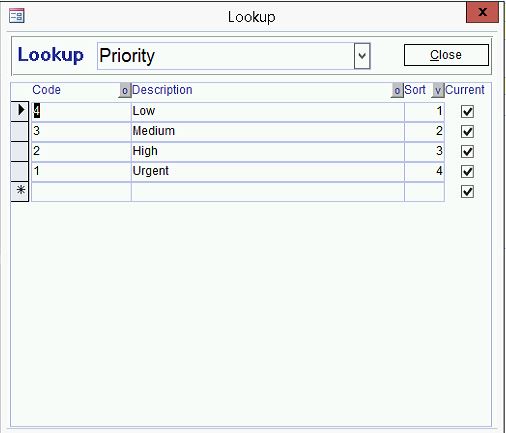
To configure, see Ribbon -> Lookup Tables -> More -> pick "Priority" (if it's not there, type "Priority" in it)
Code - the numerical weight of the priority, 1 being the lowest to 9 being the highest, eg.
1 - Low, 2 - Normal, 3 - High


)
)