|
12.2 Enter Details for Each Employee |
  
|
|
12.2 Enter Details for Each Employee |
|
12.2.1 Enter the employees First and Last Name.
12.2.2 Select Position/Title
From the drop-down, select the employee’s position in the organization.
To add a position or title, double-click on the yellow field.
Enter a Type Description.
From the Job Captain drop-down, select 'Yes' to allow employees of a particular position/title to be assigned as job captain in Jobs and Schedules. Selecting ‘No’ will restrict employees of a particular position/title from being assigned as job captain in Jobs and Schedules. The Job Captain drop-down will not show the employees flagged as ‘No’.
NOTE: The Job Captain drop-down in the Employee Types lookup defaults to ‘Yes’ when employee types are created and when you upgrade a Latitude version.
12.2.3 Select Type
Select the type of employment for the employee.
12.2.4 Enter other information about the employee.
Enter Date of Birth, Starting Date, End Date, Address and Phone numbers
12.2.5 Inactive
When an employee leaves your company, select this box to make him/her inactive
12.2.6 Enter specific Employee folder
In the Folder field, click the ellipses button and locate Employee folder or enter the path manually. If the default Employee folder is entered in Setup Latitude, it shows the Employee root folder. Select a specific Employee folder.
12.2.7 Enter Employee Email address
This email address is used by the Email Notifier (Business Edition / Corporate Edition ONLY)
12.2.8 Payroll ID and Export to Payroll
The Payroll ID must be the same as the Accounting Software Employee Card ID such as MYOB, as this links the employees
Export to Payroll - If this is not ticked then timesheets for this employee will not be exported, this could be for Salaried Staff.
12.2.9 CBCode
If your business has more than one "Core Business", you can assign one of the core businesses to the
employee as a default when entering his or her Timesheet. In this case, in "CBCode" field, select a "Core
Business" from the drop down list.
12.2.10 Default Work Type
Select a Default Work Type. The default work type of the employee auto-fills the 'Work Type' field in the timesheet when the job selected has no default work type.
NOTE: You cannot assign a standard disbursement work type to an employee's Default Work Type. Before it can be used as a default work type, it must first be assigned to the employee.
12.2.11 Rate Class
Select an Employee Class. This option is used when you use Employee Class Override Charge Rate type. Enter Employee Classes in the Employee Rate Class lookup table.
12.2.12 Flex Balance – Accumulated no. of hours/days at the beginning of the Financial Year which can be taken as a day-off at a later time. Balance updates can be generated from the reports.
Nominal Hrs./Day – no. of working hours
12.2.13 Company
Group Clients, Employees and Jobs by your departments or divisions. Generate reports from employees per department or division
How to a assign employees in a company
Go to 'Management' menu -> click 'Employee' to open the Employee Screen. Select a certain employee -> select the company from 'Company' dropdown field
12.2.14 Employee End Date
Field to hold end date for a staff members' period of employment.
12.2.15 Approval Tab
Approval refers to Timesheet Approval and Field Ticket Approval and applies if either of these modules are turned on.
Auto Approve - Set to 'Yes' if the current employee is exempt from the Timesheet Approval process or if the employee can approve Field Tickets when they are the Team Leader on the ticket.
Can Approve Employees - Enter the list of employees for which the current employee can approve Timesheets of or for which the current employee can approve Field Tickets where they are the Team Leader
12.2.16 Equipment Tab
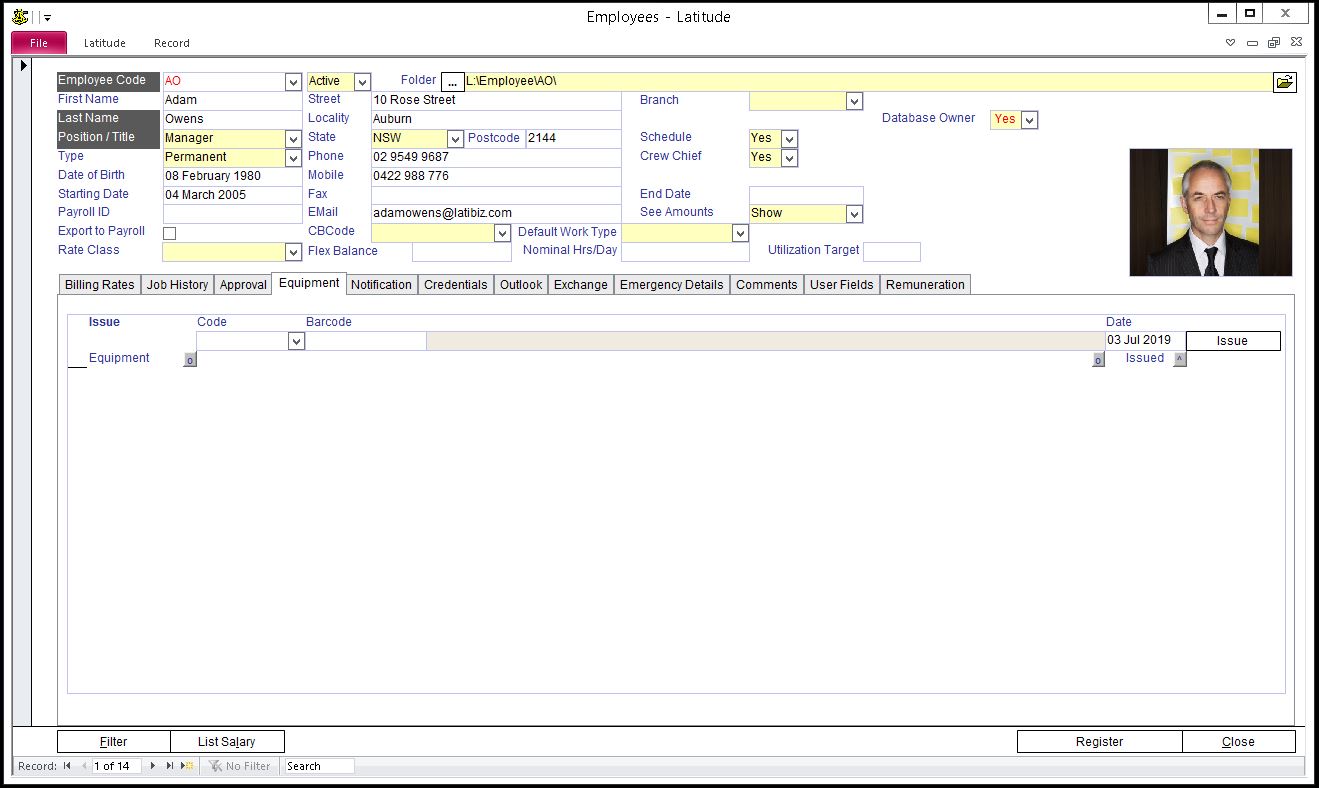
You can view equipment issued to the employee in the Equipment tab.
To issue equipment to the employee, select equipment from the Code drop-down, enter a date, and click the ‘Issue’ button. If the employee returns the equipment, click the ‘Return’ button corresponding to the equipment issued. A Return Equipment dialog opens where you can enter comments. When complete Click the 'Return' button.
To view, modify, and update the list of equipment issued to and returned by a particular employee, go to the Equipment screen, and click the History tab of the particular equipment.
12.2.17 Notify Tab (Business Edition / Corporate Edition ONLY)
Select the Notify Group the employee belongs to. To learn more about Notify Groups, see "How do I handle Reminders and Notifications" help section.
12.2.18 Enter Emergency Details
The emergency details tab is a section where you can record next of kin or emergency contact information.
12.2.19 Comments
Enter any comments about the employee
12.2.20 User Fields
There are 10 user definable fields that you can use for what ever you wish. Labels may be changed as well to reflect the information retained in the field.
The Employee user defined fields are called:
txtEmpUserField and are numbered 1 - 10.
For more information on customising fields see the section Custom Fields in this manual.
12.2.21 Notes
The Notes tab is used to hold other information about the employee. Use the File column to link external file documents to the employee i.e. resume, insurance policies.
You can record multiple dated notes against each employee. These might remind you of salary reviews or booked annual leave etc.
12.2.22 Enter History and Remuneration for the Employee.
The History tab is an area where you can store text about this employee. The Remuneration tab is a section to record information about the employees pay.
12.2.23 If the employee is on salary, press the "Show Salary" button and enter the salary information in "Employee's Salaries" screen.
This is on a separate form so you can secure it. For more information about security see the User and Object Security sections of this manual.

)